
Best Golf Simulator for a Basement (2026): Low Ceiling Builds That Work

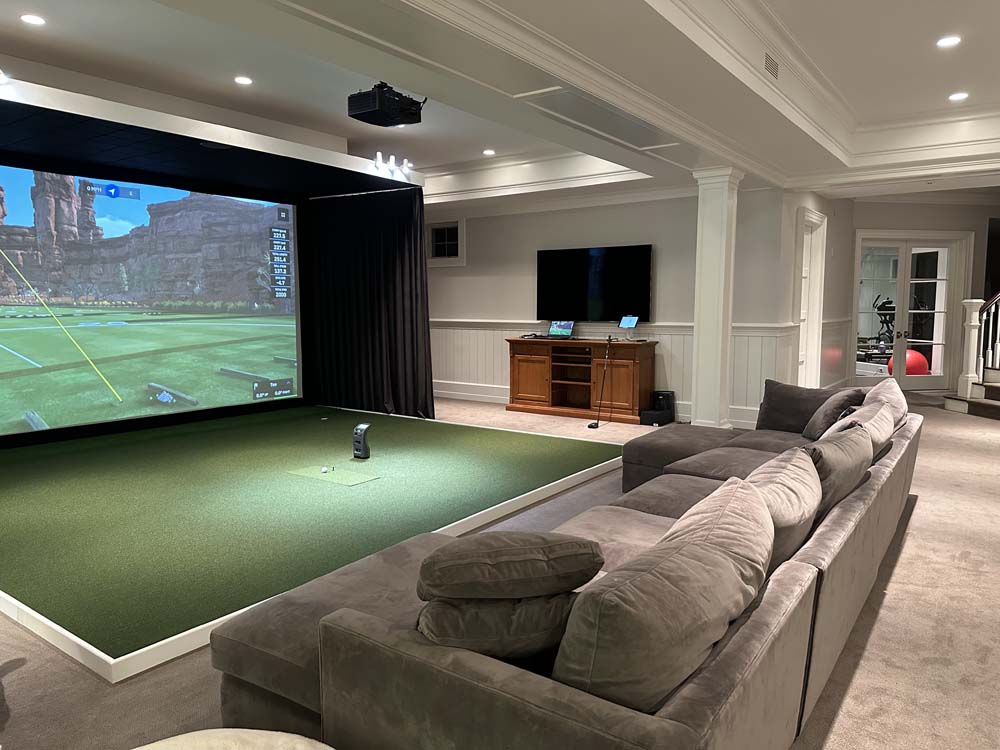
Best Golf Simulator for a Basement (2026): Low Ceiling Builds
An 8.0 to 8.5 foot ceiling works, but you must use camera-based units. Radar gets messy in tight spaces. Finding the best golf simulator for basement setups requires picking software first, planning for three-year total costs, and accepting driver limitations depending on your swing.
These five low-ceiling builds fit around ducts and columns, supported by our build tables that should tell you everything you need to know about each product.
1. The Bushnell Launch Pro Build: Best Golf Simulator for Basement Spaces with Low Ceilings
Many golfers think finding the best golf simulator for a basement is about buying the most expensive brand on social media. It is not. Indoor accuracy is decided by launch monitor technology and physical room fit. Concrete walls, metal ductwork, and low overhead clearance create a nightmare of signal interference for radar units. The camera-based Bushnell Launch Pro is the high-confidence indoor pick for sub-9 foot ceilings because it sits beside the ball and ignores surrounding metal and concrete.
Choose your software before buying hardware. This build is designed around GSPro, the community favorite for course variety and realistic physics, which requires a dedicated Windows PC. If you prioritize polished, licensed course play, E6 Connect is a compatible alternative, but GSPro is the engine driving this setup.
Space requirements for camera-based units are highly forgiving on room depth. Because this launch monitor sits beside the ball, you do not need massive ball flight space to get accurate data. You can run this setup in 14 feet of total room depth. This layout allows for 1 foot of screen clearance, 8 feet from ball to screen, and 5 feet of clear room behind the player.
For ceiling height, 8.5 feet is workable for irons and hybrids, but driver swings depend entirely on your height and swing path. Golfers over 6 feet tall will likely need to stick to irons to avoid hitting the ceiling. Basement width is also tight, so if a support column forces you near a wall, you must set up an offset hitting position rather than hitting from the exact center.
To build this out, you need specific, low-profile components that maximize your limited vertical space:
- Launch Monitor: Bushnell Launch Pro ($2,499)
- Software: GSPro ($250 per year)
- PC: Dedicated gaming PC with at least an Nvidia RTX 3060 or 4060 GPU. Do not cheap out here; GSPro demands a strong graphics card to run smoothly without lag ($1,000).
- Enclosure: Compact, 7.7 to 8.5 foot height class enclosure ($1,200).
- Projector: Short-throw projector mounted directly above the hitting area to prevent shadows and clear low-hanging ductwork ($800).
- Mat: TrueStrike or Fiberbuilt mat on a low-profile underlayment to protect joints on concrete without stealing vertical inches ($500). Standard mats over concrete will cause joint pain over time; a dedicated gel or fiber strip mat is essential.
- Safety: Side netting to protect the shank zone ($150).
Do not look only at the hardware sticker price. To run GSPro on the Bushnell Launch Pro, you need the Gold subscription package from Bushnell to unlock third-party software integration.
- Launch Monitor: $2,499
- Gold Subscription: $499 per year ($1,497 over three years)
- GSPro Software: $250 per year ($750 over three years)
- Components (PC, Enclosure, Projector, Mat, Safety): $3,650
- 3-Year Total Cost of Ownership: $8,396
The primary weakness here is ecosystem lock-in. The Bushnell Launch Pro shares its photometric engine (using high-speed cameras to photograph ball and club data at impact) with the $7,000+ Foresight GC3, but you are buying into a Foresight-style subscription model. If you stop paying the annual fee, your simulator features lock up. It is also not the cheapest path once you factor in the gaming PC and short-throw projector.
Verdict: If you have a sub-9 foot ceiling and do not have 18 to 20 feet of depth, this is the safest "will actually work" build to start with.
2. The SkyTrak+ CPO Build: The Best Golf Simulator for Basement Setups with 8.0-Foot Ceilings
Stop pretending you can swing a driver in an 8.0-foot basement. Unless you are short with an incredibly flat swing plane, an 8.0-foot ceiling is strictly an irons and wedges room. Do not buy a system expecting to rip a 46-inch driver, or you will damage your drywall. If you accept this limitation, you can build a high-value iron practice room using a camera-based launch monitor that fits where radar systems fail.
Camera-based launch monitors sit on the floor beside the ball. They only need to see the first few inches after impact, meaning they do not require the long ball flight of radar units. Floor placement also keeps your ceiling completely free of hanging sensors. For this setup, you only need 10 to 12 feet of total depth, allowing 1 foot of screen clearance, 7 feet from ball to screen, and 4 feet of clearance behind you.
To get this build running in tight vertical space, use these specific components:
- Launch Monitor: SkyTrak+ ($2,495). New units are no longer sold direct, so you must buy Certified Pre-Owned (CPO) stock.
- Software Path A (E6 Connect): Use this for a polished, packaged experience that runs on iOS or PC.
- Software Path B (GSPro): Choose this ($250 per year) for the massive community course library, which requires a gaming PC.
- Display: Go TV-first. If your ceiling is under 8.5 feet or cluttered with ducts, a wall-mounted flat-screen costs less and eliminates the risk of hitting a projector with a high wedge shot.
- Screen/Enclosure: Use a compact net or a low-profile 7.5-foot impact screen frame that sits safely below your ceiling line.
- Flooring: Build a low-profile subfloor using 3/4-inch to 1-inch EVA foam tiles and insert a high-quality hitting strip. Never place a thin mat directly on bare concrete, or you will develop joint pain.
The financial math must include subscription costs over three years. The hardware is only part of the real cost:
- SkyTrak+ CPO Hardware: $2,495
- SkyTrak Game Improvement Subscription: $19.99 per month ($720 over three years)
- GSPro Software: $250 per year ($750 over three years)
- TV, Net, Subfloor, and PC: $1,800
- 3-Year Total Cost of Ownership: $5,765
The primary weakness here is setup friction. Because the SkyTrak+ is an optical unit, leveling and alignment are critical. If the unit sits even slightly lower than your hitting mat, or if it is not perfectly parallel to your target line, your launch direction and spin numbers will be off. Buying CPO-only also means accepting a used device.
Do not buy this build if you are a tall player who refuses to compromise on swinging the driver. If you insist on full swings with long clubs in an 8.0-foot room, you will end up frustrated. But if you want a reliable, budget-friendly way to practice your mid-irons and wedges through the winter, this is the most practical basement layout available.
3. The Uneekor EYE XO Build: Best Overhead Golf Simulator for Left and Right-Handed Basement Play
If your basement sim has to host both lefties and righties, a floor-mounted launch monitor is a constant headache. Swapping players means physically moving the device, changing the hitting offset, and recalibrating. For a permanent, dedicated basement build, an overhead system is the only clean solution. It allows both left-handed and right-handed players to swing from the exact same center spot without interrupting the game.
Choose your software before buying hardware. This build is anchored by GSPro and Uneekor's native View software, which run on a Windows PC rather than an iPad. Because GSPro utilizes demanding 3D graphics, your graphics card (GPU) is the absolute bottleneck. Do not cheap out on the computer, or your high-end overhead monitor will stutter.
Here is the itemized breakdown for this premium dual-handed build:
- Launch Monitor: Uneekor EYE XO ($7,500). An overhead camera system measuring raw club and ball data at impact without requiring club stickers.
- Software: GSPro ($250/year) and Uneekor View (included). Connects natively with no third-party connector tools required.
- PC: Gaming PC with at least an Nvidia RTX 4070 GPU ($1,500) to render 4K course graphics smoothly at high frame rates.
- Enclosure: Premium wide-aspect enclosure sized to your basement width constraints ($2,000) to protect your ceiling and side walls.
- Projector: BenQ LH820ST laser short throw ($1,999). Mount it between the player and screen to avoid casting head shadows while preserving 3,000 lumens of brightness.
- Mat: Centered double-sided hitting mat ($800) with concrete-friendly foam underlayment to absorb impact and prevent joint fatigue.
Space requirements for overhead units are highly strict. You need a minimum ceiling height of 9.5 feet, though 10 feet is highly recommended. Low ceilings make overhead installs more sensitive, not less. You must account for your driver swing clearance and the physical mounting depth of the EYE XO unit itself, which hangs down several inches.
On the plus side, room depth is highly forgiving. Because the launch monitor mounts on the ceiling in front of the player, it requires no floor space behind or beside the ball. A total room depth of 14 feet is more than enough to safely swing your longest clubs.
Basement environments also present humidity risks. Unfinished concrete walls trap moisture, which ruins sensitive high-end electronics. Protect your $7,500 cameras and gaming PC by running a dedicated dehumidifier to keep room moisture levels low.
Over three years, the total cost of ownership includes:
- Uneekor EYE XO Hardware: $7,500
- GSPro Software: $250 per year ($750 over three years)
- Components (PC, Projector, Enclosure, Mat): $6,299
- 3-Year Total Cost of Ownership: $14,549
The weaknesses here are cost and complexity. Upfront hardware and component pricing is high relative to floor units. The installation process is also steep, requiring you to mount a heavy camera system to joists, route cables through the ceiling, and run a physical calibration board.
If your basement is the “hangout sim” and you can meet the ceiling math, overhead is the cleanest experience day-to-day.
4. The Garmin R50 Build: Best Golf Simulator for Basement Spaces with Minimal PC Setup
Most high-end basement builds get bogged down in computer setup. Instead of hitting balls, you spend nights troubleshooting Windows updates, graphics drivers, and third-party API bridges. The Garmin R50 bypasses this headache by building the simulation engine directly into the launch monitor.
This build fits basement owners with at least a 9.0-foot ceiling and ample depth who want to skip the PC entirely. The R50 features a built-in 10-inch touchscreen and outputs directly to a projector or screen via a single HDMI cable.
For the simplest setup, Garmin's native Home Tee Hero is the default choice. It offers access to over 43,000 virtualized courses with no computer required. If you want the community-standard GSPro software, the workflow changes. You must run GSPro on a dedicated gaming PC and manage an external network connection to link the device.
To complete this self-contained basement build, you need the following itemized components:
- Launch Monitor: Garmin R50 ($5,000)
- Display: Short-throw projector connected via HDMI ($800) or a TV-first layout with a wall-mounted flat screen if low-hanging HVAC ducts make overhead mounting risky.
- Enclosure & Screen: Carl's Place DIY Enclosure Kit ($1,200)
- Hitting Mat: TrueStrike or Fiberbuilt mat ($500)
- Safety Netting: Side barrier nets ($150)
Your room dimensions dictate whether this build works. A 9.0-foot ceiling is the borderline limit for an average golfer. While you can swing irons freely, clearing a driver depends heavily on your physical height, swing plane, and club selection.
Do not ignore depth requirements. Although the R50 uses cameras, its hybrid tracking system acts like a radar unit, requiring ample ball flight distance to measure precision data. You need a conservative 16 to 18 feet of total room depth. Do not force this unit into a shallow 12 to 14-foot basement.
Basements also introduce unique radar interference risks. Exposed metal ductwork, copper pipes, and reflective concrete walls cause signal bounce and tracking errors. You must insulate, dry-wall, or cover these surfaces with sound-absorbing materials to prevent missed shots.
The three-year total cost of ownership (TCO) for a native setup includes:
- Garmin R50 Hardware: $5,000
- Garmin Golf Subscription: $99 per year ($297 over three years)
- Components (Enclosure, Projector, Mat, Nets): $2,650
- 3-Year Total Cost of Ownership: $7,947
If you upgrade to GSPro, add roughly $1,750 for a gaming PC and the annual software license.
The R50 has two major drawbacks. First, tracking accurate club data requires applying physical adhesive stickers to your clubfaces before swinging. If you hate prepping gear, this is tedious. Second, it is a space hog that cannot compete with side-mounted camera units in tight rooms.
Verdict: If your room math supports the depth and you want a self-contained simulator, the R50 is the cleanest path to bypass PC frustrations. If your ceiling is under 9 feet or your room is shallow, look at the camera-based builds instead.
5. The Rapsodo MLM2PRO Build: The Best Budget Basement Simulator
Many budget golfers buy a portable launch monitor planning to drop it straight into their basement. They assume any open floor space works, only to end up with missed shots because they overlooked the physical math. If you want a cost-effective setup that delivers accurate iron practice, the Rapsodo MLM2PRO is the best entry point, provided you respect the room's constraints.
Choose your simulation software before buying hardware. The MLM2PRO includes its own app and basic E6 Connect, but it connects to GSPro through a community-developed API bridge. To unlock any simulator integrations, you must pay Rapsodo’s $99 annual subscription, which is only free for your first year. Keep in mind that GSPro requires a dedicated gaming PC; a basic laptop or Mac will not run it.
A realistic budget basement build prioritizes safety and function over aesthetics:
- Launch Monitor: Rapsodo MLM2PRO ($699)
- Software: GSPro ($250/year, requires a Windows gaming PC)
- Display: Side-wall mounted TV. This keeps setup costs low and removes the risk of a high follow-through hitting an expensive projector.
- Net and Safety: Heavy-duty impact net with side barrier nets. Basements have concrete walls and exposed pipes, making shank protection mandatory.
- Mat: A modular hitting strip set into a subfloor of one-inch EVA foam tiles. Hitting off a thin mat placed directly on bare basement concrete will cause joint injuries.
Your basement dimensions dictate whether this setup will function. The MLM2PRO cannot solve low ceilings; your physical swing clearance determines which clubs you can use, not the launch monitor. Because this is a camera-radar hybrid, you must place the unit 6.5 to 8.5 feet behind the ball, with at least 8 feet of ball flight in front of the tee. This requires 15 to 17 feet of total depth, and anything under 14 feet causes constant missed shots.
To calculate the real financial commitment, look at the three-year total cost of ownership (TCO):
- MLM2PRO Hardware: $699 (includes first-year subscription)
- Rapsodo Subscription: $198 (years two and three)
- GSPro Software: $750 (three years)
- RPT Spin Balls: $40 (custom-dotted balls required for measured spin data)
- DIY Build Components (TV, Mat, Net): $950
- 3-Year TCO: $2,637
You must accept two critical weaknesses. First, driver accuracy is a known issue; the unit struggles with driver spin readings and shows high data variance compared to its excellent iron performance. Second, the radar-hybrid system is highly sensitive to basement environments. Unshielded fluorescent lights, metallic insulation, and exposed metal pipes can easily interfere with the tracking signal.
Verdict: The MLM2PRO is the best budget golf simulator for basement builds if you have the required depth and accept the driver spin tradeoff. If your room is too shallow, a camera-based unit like a certified pre-owned SkyTrak+ is where you should spend the extra cash.
How to Choose the Best Golf Simulator for Basement Spaces
Building a golf simulator in a basement presents unique structural challenges. Follow this step-by-step framework to plan your space before buying any gear.
Step 1: Select Your Simulation Software First
Before looking at hardware, choose your software. Your choice between GSPro (approximately $250 per year) or E6 Connect dictates your PC requirements, your annual subscription budget, and your launch monitor options. Factor in these ongoing software fees first, then build your hardware shortlist around compatible monitors.
Step 2: Why Camera-Based Monitors Win in Basements
Photometric (camera-based) launch monitors are the superior choice for the best golf simulator for basement builds. Cameras sit directly beside the ball and read impact data immediately, requiring only 8 to 10 feet of ball flight.
Radar-based systems require 14 to 16 feet of ball flight to track the Doppler signal. They are also highly sensitive to metal ductwork, copper pipes, and steel columns that bounce radar signals and cause missed shots. If your space cannot meet the depth required for radar, choose a camera-based system.
Step 3: Map Your Ceiling Height Clearance
Measure from the floor to your lowest obstruction, like a finished soffit, support beam, or HVAC duct. Use this baseline table to estimate your clearance needs:
| Player Height | Wedge / Short Iron | Mid Iron / Hybrid | Driver (Standard 45") |
|---|---|---|---|
| Under 5'8" | 8.5 feet | 8.5 feet | 9.0 feet |
| 5'8" to 6'0" | 8.5 feet | 9.0 feet | 9.5 feet |
| Over 6'0" | 9.0 feet | 9.5 feet | 10.0+ feet |
These figures include a 6-inch buffer. Do not guess. Take your longest club and do a slow-motion test swing in your exact hitting spot.
Step 4: Run the Basement Room Math
Verify your room dimensions against these strict baselines:
- Depth: You need 1 foot of screen clearance, 8 to 10 feet of ball-to-screen distance, and 5 feet of backswing safety space. This puts the minimum depth for camera setups at 14 feet.
- Width: You need 12 feet for center-hitting. If columns block your space, use an offset layout to swing freely while aiming at an angle.
Step 5: Solve Low-Ceiling Projector Placement
Low ceilings limit where you can safely mount a projector. You have three paths:
- Short-Throw Ceiling Mount: Place the unit directly above or in front of the tee, outside your swing arc.
- Off-Center Mount: Mount the projector to the side to clear ductwork, using horizontal keystone correction to square the image.
- TV-First Layout: If your ceiling is under 8.5 feet, mount a flat-screen TV on the side wall instead of using a projector.
Step 6: Protect Your Joints on Concrete Floors
Do not drop a standard hitting mat directly onto bare basement concrete. The repetitive shock will cause joint injuries. Avoid building a thick wooden platform subfloor, which steals 2 to 4 valuable inches of ceiling height. Instead, lay 1-inch interlocking EVA foam tiles and insert a premium hitting strip.
Step 7: Manage Moisture and Basement Lighting
Concrete releases moisture, so run a dehumidifier to keep the room below 50 percent humidity. This protects your PC and launch monitor. Ensure HVAC vents do not blow directly on the screen to prevent billowing.
For lighting, use a focused spotlight directly over the hitting mat. This helps the launch monitor cameras see the ball clearly without washing out the projected screen image.
Frequently Asked Questions
Can I hit driver in an 8 foot basement?
No, most golfers cannot swing a driver in an 8 foot basement. A standard driver swing requires at least a 9.5 foot ceiling to safely clear your follow-through. In an 8 foot space, you are limited to an irons-only practice bay to avoid destroying your drywall and clubs.
Best launch monitor for tight basement depth?
Camera-based photometric launch monitors are the best choice for shallow basement spaces. Camera units like the SkyTrak+ or Bushnell Launch Pro sit beside the ball and work in 10 to 14 feet of total room depth. Radar units require up to 18 feet and suffer from signal interference from basement pipes.
GSPro vs E6 Connect for basement golf simulator?
GSPro is the better option if you want realistic physics and community-designed courses, but E6 Connect is enough if you want a simple iPad setup. Keep in mind that running GSPro requires a dedicated Windows gaming PC with a strong graphics card, which is a significant hidden cost.
Can you use a TV instead of a projector for golf simulator?
Yes, using a wall-mounted flat screen TV is often the smartest choice for low-ceiling basements. This layout eliminates the risk of hitting a projector with a high wedge shot and clears up valuable ceiling space, though you sacrifice the immersion of hitting directly into a large impact screen.
How to handle basement support columns in golf simulator?
Measure your ceiling clearance from the lowest hanging joist or duct, and use an offset hitting layout. If a support column blocks the center of your space, place your hitting mat to the side and aim slightly diagonal. This keeps your swing path completely clear of obstacles.
How much does a basement golf simulator cost?
A basement golf simulator costs between $2,600 and $14,500 over three years. For example, a budget Rapsodo MLM2PRO build totals $2,637 over three years. A photometric Bushnell Launch Pro setup runs $8,396 over three years once you factor in necessary software subscriptions, the enclosure, and a gaming PC.
Related Guides
Square Golf Omni Setup Guide (2026): First Run and GSPro Connection
Master your Square Golf Omni setup with our step-by-step guide. Learn exact Ready Zone dimensions, app calibration, and how to connect to GSPro cleanly.
How to Build a Golf Simulator in Your Garage: Step-by-Step (2026)
Learn how to build a golf simulator in your garage with this step-by-step 2026 guide. Get exact clearance dimensions, costs, and projector setup tips.
Golf Simulator for Small Rooms: Best Setups Under 12 Feet Deep
Need a golf simulator small room setup? Discover the best camera-based and overhead builds under 12 feet deep with real placement math, costs, and gear.