
Best Golf Simulator for Garage (2026): What Actually Fits

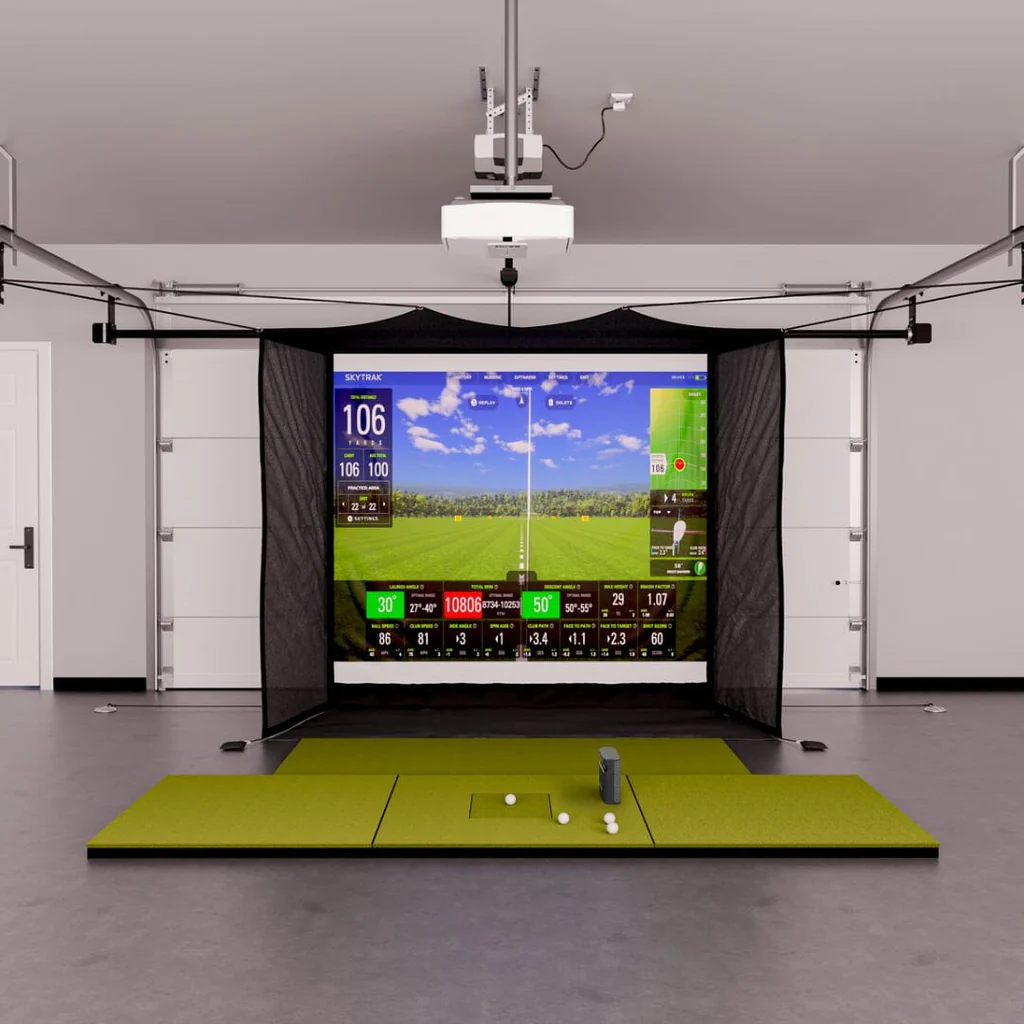
Best Golf Simulator for Garage (2026): What Actually Fits
Your primary hurdle in the garage is clearing your ceiling and the door opener rail. If you clip that track on a backswing, your build is over.
Finding the best golf simulator for garage setups requires planning around these physical constraints first. This guide delivers real room dimensions, a clearance checklist, concrete-floor fixes, and three complete builds from $1,500 to $6,000 with honest total costs.
First, verify your clearance.
1. Space Requirements: What Fits the Best Golf Simulator for Your Garage
The blunt reality of garage simulators is that they fail because of physical clearance, not because of product choices. Too many people measure their flat ceiling, buy their gear, and then realize they cannot swing a driver because of a hanging garage door track.
You must measure your usable swing corridor height instead of raw ceiling height. This corridor is the actual path your club head travels. It is frequently blocked by garage door opener motor heads, trolleys, rails, tracks, or overhead storage racks. Measure from the finished floor to the lowest hanging obstruction. If that clearance is under 9 feet, you will struggle to swing a driver even if your drywall ceiling sits at 10 feet.
Matching your physical room dimensions to your launch monitor technology is the first step to building the best golf simulator for a garage.
| Launch Monitor Type | Minimum Width | Minimum Depth | Minimum Ceiling Height | Notes |
|---|---|---|---|---|
| Radar (Behind-you) | 10 to 12 feet | 14 to 16 feet | 9.5 to 10 feet | Needs 7 to 8 feet ball-to-screen, plus 7 to 8 feet ball-to-monitor behind you. |
| Optical/Camera (Side-mount) | 10 to 12 feet | 8 to 10 feet | 9 to 9.5 feet | Sits beside the ball. Workable depth only requires swing room and screen protection. |
Radar units require substantial room depth to track ball flight. If you use a radar device like the Garmin Approach R10, you need 14 to 16 feet of total depth. This requirement is why single-car garage bays often fail the depth math.
Camera-based launch monitors sit next to the ball, making them the default choice for short garages because they only need 8 to 10 feet of workable depth.
For width, a standard garage bay provides 10 to 12 feet. If you are tight on width, use an offset hitting position. This means teeing up slightly to the side rather than the exact middle of the screen, keeping your backswing safe from the side wall.
Will My Garage Work? Clear Checklist
- Height: Measure from the floor to the lowest obstruction (like a garage door rail or opener motor). You need a minimum of 9 feet for irons and 9.5 feet for a driver.
- Opener Clearance: Identify any low points in your swing path. If a standard track blocks you, plan for a wall-mounted jackshaft opener.
- Depth: Match your launch monitor. Camera-based systems need 8 to 10 feet from ball to screen, while radar setups require 14 to 16 feet of total depth.
- Width: Keep a minimum of 10 feet of width to clear walls during your follow-through.
- Power and Lighting: Ensure outlets are available near your planned projector, hitting mat, and PC locations.
Always choose your simulation software before you buy hardware. Decide whether you want to run GSPro, E6 Connect, or a device-native app first, since your software choice dictates which launch monitors you can use.
Once you settle on software, let your space dictate the hardware. If your garage is short on depth, look at camera-based builds. If you have ample depth and want outdoor portability, a radar-based system can work.
2. The Best Budget Golf Simulator for Garage Setups: Garmin R10 Net Build
This setup is for the golfer who needs to share their space with a car. Keep in mind that a net-only build means practice and basic simulation, not a full impact-screen projector bay. It is a highly functional practice station you can tear down and store in ten minutes. If you want to get swings in during the winter without losing your parking space, this is your starting point.
The Build Breakdown
- Launch Monitor: Garmin Approach R10 ($599)
- Hitting Net: GoSports Elite 10' Net ($150)
- Display: 43-inch TV on a heavy-duty rolling stand ($250)
- Hitting Surface: 5x5 hitting mat plus 1-inch EVA foam underlayment tiles ($240)
- Side Protection: GoSports Shank Net ($50)
The concrete floor of a garage is unforgiving. If you lay a cheap mat directly on concrete, your elbows and wrists will suffer within a month. Placing interlocking anti-fatigue foam tiles underneath your hitting mat absorbs the vibration and mimics turf much better.
Space Requirements: The Radar Math
Because the Garmin R10 is a radar unit, you must have the physical depth to make it work. The R10 sits 7 feet behind the ball, and the ball needs 8 feet of flight before hitting the net. Add 1 foot of clearance behind the net to prevent wall rebounds, making the minimum total depth 16 feet. In a 12-foot space, the radar lacks the ball flight to track accurately, leading to constant misreads.
Software and Connection Workflow
You do not need a gaming PC for this build. Out of the box, the R10 runs on an iPad or phone via the Garmin Golf app. To run GSPro, you must connect the R10 to a PC using a community-developed API connector. If GSPro is your priority, the R10 works but requires extra technical steps compared to native integration.
Total Cost of Ownership (3-Year Reality)
The hardware subtotal is $1,289. But the recurring software is where most budget posts mislead you. If you stick with the Garmin ecosystem for Home Tee Hero, you will pay $99 per year. Upgrading to GSPro costs $250 per year.
Over three years, your total investment looks like this:
- With Garmin Software: $1,586 total
- With GSPro Software (requires PC): $2,039 total
Also budget $50 for required but forgotten accessories like charging cables, a leveling stand, and alignment sticks. The R10 is highly sensitive to being unlevel or misaligned.
The Honest Tradeoffs
The R10 is an entry-level radar unit, meaning it estimates spin rather than measuring it like an optical camera system. It is not the same as a camera unit indoors. Moving garage doors, metal refrigerators, or running fans will interfere with the radar, causing ghost readings.
Who It Is For
This build is for the budget-conscious beginner with a dual-use garage. It gets you real reps now, and your R10 and hitting mat will transition perfectly if you upgrade to a permanent screen and projector later.
3. Best Golf Simulator for Garage Under $3,000: The Rapsodo MLM2PRO Impact Screen Build
On paper, a $3,000 budget seems generous. In reality, building the best golf simulator for garage spaces gets tight once you step up from a net to a full impact screen and projector. This tier offers your first true simulator feel, but it is still a compromise. You trade professional-grade launch monitor accuracy for an immersive, screen-based environment.
The Build Breakdown
- Launch Monitor: Rapsodo MLM2PRO ($699)
- Screen and Enclosure: DIY EMT frame, Carl's Place impact screen, side curtains ($550)
- Projector: Optoma GT1090HDR ($1,000)
- Hitting Mat: 5x5 premium mat ($250) with 1-inch EVA foam underlayment ($50)
- Accessories: Rapsodo RPT spin balls ($40)
Space and Projector Setup
The MLM2PRO is a hybrid radar and camera unit, meaning room depth is non-negotiable. The device sits 6.5 to 8 feet behind the ball, and you need at least 8 feet of ball flight to the screen. Plan on a practical garage depth of 14 to 16 feet to avoid constant misreads.
The Optoma GT1090HDR short-throw projector (0.50 throw ratio) mounts 7 to 8 feet from the screen, keeping it directly above or slightly in front of your tee. This placement eliminates shadows but risks ball strikes. A stray wedge shot in a low garage ceiling will destroy an unprotected lens, so budget for a protective shield.
Never lay your hitting mat directly on bare concrete. Placing interlocking EVA foam tiles beneath your mat provides vital joint cushioning. Also, garages feature hard tools and metal door tracks that cause violent ricochets. Hang heavy side curtains or netting to protect your space.
Software and PC Decisions
Your software choice splits this build into two distinct financial paths:
- Option A (Mobile): Run the Rapsodo app or E6 Connect on an iPad, avoiding PC costs.
- Option B (PC): Run GSPro on a dedicated gaming PC. Note that the MLM2PRO connects to GSPro via a community-built API rather than native integration.
Total Cost of Ownership (3-Year Reality)
The real cost of this build depends on your computer hardware. The MLM2PRO requires a $99 yearly subscription to unlock simulator features.
- Without a PC (Option A): $2,589 hardware + $297 (3-year subscription) = $2,886 total.
- With a GSPro PC (Option B): Add a $900 gaming PC (where the GPU is the bottleneck) plus $750 for 3 years of GSPro. The 3-year cost jumps to $4,536.
The Honest Tradeoffs
While highly accurate with irons, driver accuracy is the MLM2PRO's known weakness because it frequently under-reads high-speed spin. You must also use the marked RPT balls to get real spin data indoors. If you lose them or use standard balls, spin numbers become rough estimates.
Who It Is For
This setup is for the player who wants a real screen and projector experience without spending $5,000. If you have at least 14 feet of depth and can tolerate some driver spin inaccuracy, it offers the most immersive garage package possible under $3,000.
4. Best Permanent Garage Golf Simulator: The Bushnell Launch Pro Mid-Range Build
There is a point in every garage build where you get tired of troubleshooting connection drops, aligning radar stands, and worrying if a garage fan is throwing off your spin numbers. This tier is where those frustrations disappear. If you want a setup that feels like a permanent, commercial-grade bay and works every time you flip the power switch, this is your "done once" build.
The anchor is the Bushnell Launch Pro ($2,499). It uses the exact same photometric optical engine (the camera system that images ball impact) as the $7,000 Foresight GC3, giving you professional-grade accuracy at a fraction of the hardware cost.
Here is the recommended complete itemized build:
- Launch Monitor: Bushnell Launch Pro ($2,499)
- Enclosure: SIG PRO SIG8 ($3,299) or equivalent 8-foot enclosure providing side and ceiling protection.
- Projector: BenQ LH820ST ($1,899). A premium short-throw laser projector built for high brightness in rooms with ambient garage light.
- Hitting Mat: Fiberbuilt Hourglass ($499) for joint-saving durability, or Country Club Elite for realistic feel. Combine with a concrete-friendly subfloor of 1-inch EVA foam tiles.
- PC: Dedicated gaming PC ($1,000). Focus on a strong GPU like an Nvidia RTX 4060 or 4070 instead of CPU hype.
Space Requirements
Because the Launch Pro is camera-based, it sits next to the ball instead of behind you. This makes it highly tolerant of tight garages. While radar units demand 15 or more feet of depth, this camera setup requires only 8 to 10 feet of space from ball to screen. Your ceiling height still needs to clear your physical driver swing (at least 9.5 feet is recommended), but the monitor itself is depth-insensitive.
Software Compatibility and Connection
The monitor includes FSX Play natively. If you want to run GSPro, you must subscribe to the Bushnell Gold package to unlock third-party software connections. Check our list of what launch monitors work with GSPro to compare integration methods.
3-Year Total Cost of Ownership
This level of reliability is a serious investment. The core hardware totals $9,196. Over three years, you must factor in ongoing subscriptions to keep the system running:
- Bushnell Gold Subscription: $249 per year ($747 total)
- GSPro Subscription: $250 per year ($750 total)
- Total 3-Year Cost: $10,693
Do not overlook two common garage-specific hidden expenses: lighting control (blackout curtains for ambient light) and climate control (a heater or dehumidifier to protect your electronics from temperature shifts).
The Honest Tradeoffs
The obvious tradeoff is cost. This is not a budget build, and the annual software subscriptions are a permanent tax. You are paying a premium for a zero-friction user experience and indoor hardware reliability, not just extra data points.
Who It Is For
This build is for the home golfer wanting an indoor-first garage simulator that functions like a commercial studio. If you have the budget and want to buy once without the constant alignment and connection headaches, this is the setup to build.
5. The Pack-Away Build: Best Golf Simulator for Garage Dual-Use
If you must park your car in the garage every night, a permanent metal enclosure is a non-starter. Sometimes the best golf simulator for garage setups is the one you can completely pack away in five minutes. This layout prevents the common dual-use garage failure where the simulator becomes permanent, frustrating clutter.
The foundation of this setup is a motorized retractable screen. The HomeCourse Pro Screen ($2,000) mounts to your ceiling and drops down via remote control. To keep setup fast, skip radar units. Use a camera-based launch monitor like the SkyTrak+ ($2,495 CPO) which sits beside the ball and limits your required depth to just 8 to 10 feet.
The SkyTrak+ connects natively to E6 Connect and runs GSPro via an API connection. This integration requires a $240 per year software subscription. For the display, mount a short-throw projector like the Optoma GT1090HDR ($1,000) on the ceiling, or protect it in a floor enclosure if your ceiling is too crowded.
You must calculate your garage door track clearance before mounting hardware. This is the ultimate "no-regrets" rule: do not mount the retractable screen where the garage door or opener trolley will hit it during travel. If you have a standard center-pull opener, it will block your projector path. Budget for a wall-mounted jackshaft opener to clear your ceiling space.
To hit a true five-minute setup target, use this layout workflow:
- Mark your hitting position: Spray-paint or tape the exact corners of your hitting mat and launch monitor on the concrete so you never waste time aligning.
- Run clean cable paths: Install a plastic ceiling raceway for projector cords. Use quick-disconnect power cables and store electronics inside to protect them from garage dust and moisture.
This convenience costs more than DIY fixed frames. The hardware stack includes the SkyTrak+ ($2,495), the HomeCourse screen ($2,000), the Optoma projector ($1,000), and a premium hitting mat ($250). Over three years, including the $240 annual SkyTrak+ subscription, your total cost of ownership is $6,465.
The honest tradeoff is screen tension. A retractable screen is never as flat or tight as a fixed frame. You will see minor waves in the projection and experience more ball bounce-back.
Buy this build if you must reclaim your garage floor space daily, not just once a season. If your garage must act as a parking bay first and a simulator second, this is your only workable path.
How to Choose the Best Golf Simulator for Your Garage: The Practical Action Plan
Building a golf simulator in a garage is different than building one in a finished basement. You are dealing with unconditioned air, hard concrete, shifting light, and tight clearance challenges. Use this step-by-step framework to make the right choices for your space before you purchase any equipment.
Step 1: Lock in Your Software and Launch Monitor Order
First, choose your simulation software. This choice dictates your hardware, platform requirements, and total cost of ownership. For example, GSPro requires a high-performance gaming PC and an annual subscription, while E6 Connect can run on an iPad. Decide between the community-driven course library of GSPro, the polished graphics of E6 Connect, or device-native options like Garmin Home Tee Hero.
Once your software is locked in, let your garage dimensions choose your launch monitor. If your depth is under 15 feet, you need a camera-based system that sits beside the ball. If you have 16 to 20 feet of clear depth, a radar-based monitor is a viable option.
Step 2: Calculate Your Projector Throw and Mount Safely
Most garage builds fail at projector math. To avoid casting shadows or hitting your device, you must calculate the throw distance before mounting. Use this simple formula: Throw Distance = Image Width × Throw Ratio.
For example, if you have an 8-foot-wide screen and a projector with a 0.50 short-throw ratio, you must mount the lens exactly 4 feet from the screen. A throw ratio between 0.40 and 0.60 is the sweet spot for a garage. This keeps the projector high and forward, out of your swing path, and prevents your body from casting a shadow on the screen.
Because garages are high-risk zones for stray balls and club strikes, always protect your lens with a metal shield or ceiling-mounted cage. Review our projector guide to find a compatible short-throw model.
Step 3: Protect Your Joints Against Concrete
Bare concrete garage floors offer zero shock absorption. Hitting balls off a thin mat placed directly on concrete will cause joint fatigue and injury over time. Build a proper subfloor layer:
- Anti-fatigue layer: Lay 1-inch interlocking EVA foam tiles or rubber gym flooring under your stance and hitting area.
- Premium mat: Prioritize a hitting mat with a thick, replaceable fiber strip to absorb club impact.
- Vapor barrier: Garages trap moisture. Lay a plastic vapor barrier directly on the concrete slab beneath your foam tiles to stop dampness from ruining your turf.
If your ceiling height fails the driver swing test during layout planning, read our basement simulator guide to see if you have more clearance downstairs.
Step 4: Manage Light, Temperature, and Condensation
Ambient light will wash out your projection. Block light spill from open garage doors or windows with blackout curtains, or use a dedicated enclosure kit to isolate the screen.
Garages also present severe temperature swings. Moving electronics between a cold garage and a warm house, or turning on a space heater in a freezing garage, causes instant condensation inside the unit. This moisture can ruin optical camera lenses and circuit boards. Avoid this by storing your launch monitor, projector accessories, and laptop indoors when not in use, and run a dehumidifier or mini-split to keep humidity stable.
Step 5: Design for a Fast Dual-Use Setup
If you still need to park cars in your garage, choose components that pack away quickly:
- Mark the floor: Use permanent tape or paint dots on the concrete to mark your mat and launch monitor positions. This eliminates recalibration time.
- Use mobile carts: Mount your gaming PC and hardware accessories on a rolling utility cart, and use quick-release ceiling mounts for your projector.
Scroll back up this guide to select the build tier that matches your dimensions and your tolerance for setup friction.
Frequently Asked Questions
What is the minimum ceiling height for a garage golf simulator?
You need a bare minimum of 9 feet of vertical clearance for irons and 9.5 feet for a driver, but your raw ceiling height is not the same as your usable swing clearance. Overhead obstructions like garage door opener motors, tracks, and support rails often hang 6 to 12 inches below the ceiling. Before buying any gear, stand in your exact hitting spot and perform a slow-motion driver swing test to make sure you clear everything.
Radar vs optical launch monitors: which is better for a garage?
Optical or camera-based launch monitors fit better in most garages because they sit beside the ball and only require 8 to 10 feet of depth. Radar units are depth-hungry and require 14 to 16 feet of total room depth to track ball flight. While optical units save depth, you still need at least 10 feet of width to avoid hitting the side wall with your follow-through.
Do you need a short throw projector for a garage golf simulator?
Yes, you almost always need a short-throw projector with a throw ratio between 0.4 and 0.6 for a garage setup. This lens ratio allows you to mount the projector 7 to 8 feet from the screen, placing it directly above or slightly in front of the tee. This mounting position prevents your body from casting shadows on the screen while keeping the expensive hardware safe behind your driver swing path.
Can you build a garage golf simulator under $3,000 that runs GSPro?
You can build a garage simulator under $3,000 that runs GSPro only if you already own a capable gaming PC. If you need to buy a computer, the cost of a dedicated PC with a strong graphics card will push your total budget closer to $4,500. Additionally, you must factor in the recurring $250 annual GSPro subscription and any community API connectors required by budget launch monitors like the Garmin R10 or Rapsodo MLM2PRO.
Will a golf launch monitor work in a cold garage in winter?
Yes, but cold temperatures and rapid temperature shifts create condensation that can permanently damage the internal optics and circuit boards of your launch monitor. To protect your electronics, store your launch monitor and PC indoors when they are not in use. Always run a heater to bring the garage to room temperature and dehumidify the space before powering up your system.
Can you still park a car in a garage with a golf simulator?
You can park a car in your garage daily if you use a retractable impact screen and a pack-away workflow. A ceiling-mounted motorized screen and a side-mounting camera launch monitor like the SkyTrak+ allow you to clear the floor in five minutes. While the screen and hitting mat can be stored away, permanent elements like the projector ceiling mount and marked floor tape for your hitting position must remain.
Related Guides
Square Golf Omni Setup Guide (2026): First Run and GSPro Connection
Master your Square Golf Omni setup with our step-by-step guide. Learn exact Ready Zone dimensions, app calibration, and how to connect to GSPro cleanly.
How to Build a Golf Simulator in Your Garage: Step-by-Step (2026)
Learn how to build a golf simulator in your garage with this step-by-step 2026 guide. Get exact clearance dimensions, costs, and projector setup tips.
Golf Simulator for Small Rooms: Best Setups Under 12 Feet Deep
Need a golf simulator small room setup? Discover the best camera-based and overhead builds under 12 feet deep with real placement math, costs, and gear.